Showing posts with label Maya. Show all posts

Sunday, 17 April 2016

Time Machine: Sci-fi Circle

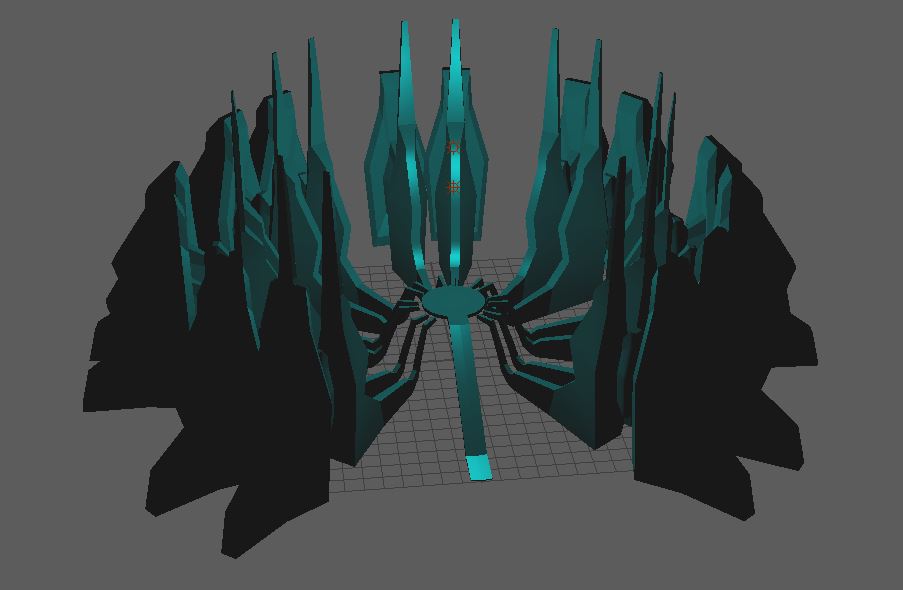
Inspired by my previous assignment I decided to create a time machine composed of a circle of pylons. I took a more science fiction approach using large flat planes to define the shape.
I tested this idea before I went any further by duplicating my mesh into a circle in Maya. I was really pleased with this preliminary check and decided to continue.
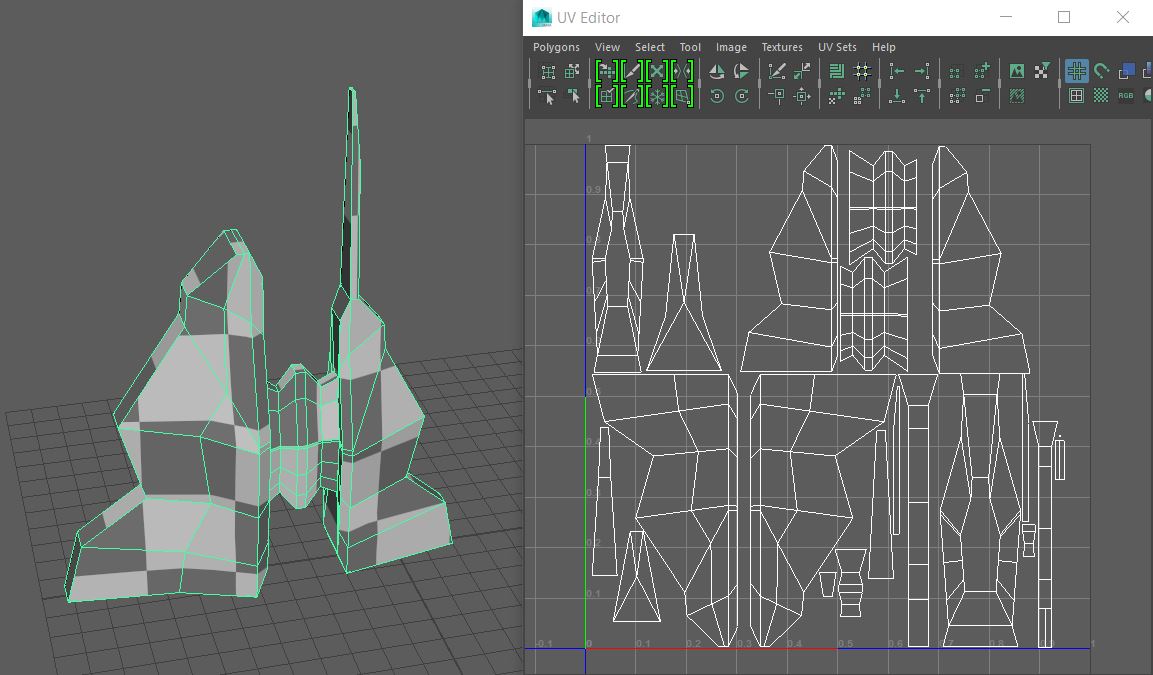
Unwrapping the UVs was simple due to the objects extremely low complexity.
The completed UV map to the right.
This is a screenshot from the turntable of my final pylon design with Albedo, Normal, Specular, Roughness and Metalness maps applied. My 
Here is the pillar among friends, a circle of. This Circle of pylons would send players throughout time, to a random destination.

Damaged Pillar: Doric Column

After struggling for a while to model my first pillar design, I moved onto something a little more achievable. I began to design the low poly mesh as a Doric Column.
After placing all of the largest shapes in the correct areas, extruding and combining the bottom and top half; I was ready to export the mesh from Maya as an OBJ file and import it to Zbrush.
Whilst in Zbrush I attacked my column with all of the wear and tear I wanted to see on the final render.
I realized I had missed a step in decimating my mesh, as the damaged sections were far too high in tri count in comparison to the rest of my mesh.
I decimated my mesh in Zbrush then reimported it. From left to right are the; Decimated, Low Poly, Damage and High Poly meshes. The damage now had to be bridged onto the low poly.
Bridging 1
Bridging 2

This process is not exactly difficult, but it is one of the most time consuming tasks I have ever encountered. It can become quite dull after a while, though the finished result is worth the effort.
UV mapping
Baking

Something went horribly wrong with my bake and the normals were crushed, stretched and distorted. I spent a long time attempting to fix this as can be seen below.
My first UV map, which did work, but it wasn't densely packed enough to make use of the 2048x2048 resolution.
I encountered issues with this map and I am still unsure why. The low poly and cage were both the exact same topology and the high poly was in the exact same position.
I decided it would be easiest to map the whole model again as opposed to puzzling over it for hours on end.
Here can be seen my final UV map, which worked perfectly. I am extremely happy to have this finished.

Wednesday, 17 February 2016

Untextured Greek Pillar Model

Practising in Maya by creating low poly objects like this pillar has helped me to stay on track with learning the programs functionalities and more importantly not forgetting them. 

Sunday, 24 January 2016

Hand Painted Barrel Model


I was given the task of texturing a stock barrel, first I had to unwrap it. After separating all of my UV islands into readable chunks, I began to paint a texture. I did this in photoshop using textured brushes atop a base coat of brown. The barrel turned out really well for my first assignment involving textures.


Friday, 22 January 2016

Maya Phone Development


I started out by making the largest shape in the phone's silhouette. I did this by placing a plane and extruding its edges upward.
I moved on to the rest of the phone's main body. This shape was fairly simple to crate using Maya's 'soft select' tool. I merely created a cylinder, then squeezed it inwards.
After learning how to create a complex shape like a helix in one of my workshops, we then learned how to attach it to a path. This was a great way to create a phone cable.
I fiddled around with this for quite some time, as I couldn't quite grasp the details at first. Whilst learning to understand this I started on the curved cylindrical shapes, for this I used the same method as with the helix. I created a cylinder and attached it to a path, I had previously tried to use a taurus shape and remove faces to create this shape; but ended up with a
much rounder and less 'pipe-like' shape.
After learning how to animate a helix along a path I applied a dark grey blinn material to my mesh. This wasn't for a specific reason other than that it looked cooler. When my work looks cool it gives me more drive to make it even cooler!
I began modelling the phones dial, which was immensely time consuming. I used a method of modelling learned in my 'Advanced Modelling' workshop. This was to create a thin cylindrical shape and delete the upper and lower faces; then create indents by pushing inwardly some circular faces and lowering them into the cylindrical loop. The objects are combined,
the gaps between the faces are bridged (using the aptly named 'bridge' tool). After modelling the dial's more basic shaped I moved on to the rope like pattern. This seemed like an impossible task for me at first, but I used a simple solution. I flattened half a taurus shape and then centred its pivot in the middle of the dial, this enabled me to duplicate and drag the shape around
in a circular motion to create the rope-like effect.

The handle was fairly simple, using soft selection and extrusions I added and subtracted from a cylinder. I was quite happy with how quickly this came together.
The rolling pin shape sits atop my mesh.
I was perplexing for some time over how to proceed with this mesh, there were some fairly complex areas of detail on either side of the phone's handle.
I added a sphere the left side of the handle and stretched it around until it was the correct shape.
Making the phone's earpiece and mouthpiece was absolutely draining. The earpiece was particularly hard to create as it has a curved shape that gets increasingly larger as it curves. Using extrusion and soft selection I got there eventually.

These detail shots of the dial showcase the rope pattern perfectly, in my opinion it's a nice touch on an otherwise relatively uninspired mesh.

The finished model, with wire.


Reference image

Maya "Advanced" Modelling

From workshop about defining hard edges with edge loops and filling gaps with the bridge tool.

This workshop was extremely useful, it was great to learn how edge loops can be used to soften/harden edges to the desired angle or curvature.  I was also shown how instead of attaching convex indents to a face, they can be floated above the mesh; this creates the illusion of an indent. This can be seen in the image above on the circular shape to the right.

Maya Silicone Watch

Study of simple silicone watch, testing out transparency and soft selection.

I enjoyed creating the watch's transparent covering, I used a lambert material and increased its transparency. The numerals on the watch face were raised slightly from the surface to emulate paint, this didn't look great though.


Monday, 4 January 2016

Crate: fist and second attempt

My first attempt at modelling an texturing a crate in Maya, this one didn't work out as the mesh consisted of several objects that intersected each other. Viewing the object from various angles gave this away and I was not happy with it.
My second try work out much better. I made a texture from images of wood found via Google. I used three different points of lighting to enhance the protuberant segments by producing shadows.

Monday, 14 December 2015

Notes on texturing

Texturing


Setting up Photoshop files
·         All textures need to abide by the power of 2
·         Document should be names in relation to model and usage in game
1.       Naming convention should be as descriptive as can possibly be
2.       Spaces are replaced with “_”

Layer Setup
·         Different maps need to be broken up into different groups and colour coded
·         Use the correct naming convention for maps – albedo, normal, metallic, roughness etc.
·         Define names in subcategories – textures, wear, grunge, details etc.
·         Any groups that need to remain hidden or are used as backup need to be named so
1.       Example group name: HIDE_Wood_Planks
(This is all to maintain cleanliness in workflow  - you may not be the only person to work on the file)

Layer Comps
·         Layer comps allow the user to take a snapshot of the current state of the layer panel.
1.       It records the state of
Non-Destructive Workflow – Masks
·         Why use masks?
1.       Masks are less destructive than using the erase brush
2.       An mistakes are easily rectified later on
3.       Easy to try out different ideas
Physically Based Rendering (PBR)
What is it?
1.       Physically based shading means we approximate what light actually does as opposed to approximating what we intuitively think it should do
2.       Physically based materials will work well in all lighting environments. In addition, the material values can be less complex.

Albedo & Normal Maps
Albedo Maps RGB
1.       Albedo is the base colour input, or diffuse map
2.       No directional light of shadow information should be included in this texture
3.       The results should be flat colours with variation applied in areas fo wear
Normal Maps RGB
1.       Similar to bump maps, create the illusion of detail without high poly count
2.       Use RGB values to signify orientation of surface normal
3.       Allowed for significant advances in efficient rendering

Metallic & Roughness Maps
·         Metallic maps – greyscale
1.       Control how “metal like” your surface will be. Materials like plastic, rock or raw materials will be set to a value of 0 or 1 and nothing in between
2.       Hybrid textures that translate between different material types like raw metls to rust will have a fall off between 0 and 1

Emissive
·         Emissive Maps – greyscale
1.       The emissive colour input controls which part of your material will glow

Ambient Occlusion (AO)
·         Ambient occlusion maps – greyscale
1.       There is no such thing as ambient occlusion in real life
2.       It’s a rendering trick which samples a hemisphere around each point of a face, sees what proportion is occluded by other geometry and shades the pixel accordingly

Realistic & Hand Painted Materials
·         Realistic materials
1.       Often seen in games with a larger memory allocation
2.       Console or PC
3.       Focus on immersion

·         Hand painted materials
1.       Often seen in mobile games, with small memory allocation
2.       Sometimes used by choice, for a stylised look

Programmes to look into
·         Substance designer
·         Substance painter
·         Quixel suite 2.0
Game engines /preview engines
·         Unreal Engine 4
·         Marmoset Toolbag 2

Resources:
Sebastian Lagarde – PBR chart for unreal
Digital Tutors CG101: what is a normal map?
Allegorithmic – substance designer and painter
Quixel – suite 2.0 http://quixel.se/
UE4 – physically based materials

Marmoset Toolbag 2